-
未登录
热门文章
企业级应用数据持久层框架,最常见的应该是 Hibernate 和 MyBatis 。
Hibernate 是相当彻底的 ORM 对象 - 关系映射框架,使用 Hibernate ,开发者可以不考虑 SQL 语句的编写与执行,直接操作对象即可。
与 Hibernate 相比, MyBatis 还是需要手工编写 SQL 语句的。恰好由于互联网行业数据量非常巨大,对 SQL 性能有比较苛刻的要求,往往都需要手工编写 SQL 。在此背景下, MyBatis 逐渐流行。
除此之外,MyBatis 是更加简单,更容易上手的框架,但是功能也是相对简陋点。
本篇就演示下,如何在 Spring Boot 框架中快速集成并使用 MyBatis 。
本篇我们使用 Spring Boot 与 MyBatis ,开发一个商城系统中商品管理模块后端部分。我们依然遵循 Restful 风格,以便团队小伙伴快速理解与接入。
我们新建数据库 shop ,其中包含商品表,结构定义如下:
CREATE TABLE `goods` (
  `id` bigint(11) NOT NULL AUTO_INCREMENT COMMENT '唯一编号',
  `name` varchar(255) DEFAULT '' COMMENT '商品名称',
  `price` decimal(10,2) DEFAULT '0.00' COMMENT '商品价格',
  `pic` varchar(255) DEFAULT '' COMMENT '图片文件名',
  PRIMARY KEY (`id`)
) ENGINE=InnoDB AUTO_INCREMENT=3 DEFAULT CHARSET=utf8;
接下来,我们可以开发 Spring Boot 后端项目了,并使用 MyBatis 作为数据持久层框架。
Spring Boot 版本选择 2.2.5 ,Group 为 com.imooc , Artifact 为 spring-boot-mybatis ,生成项目后导入 Eclipse 开发环境。
我们引入 Web 项目依赖、热部署依赖。由于本项目需要访问数据库,所以引入 spring-boot-starter-jdbc 依赖和 mysql-connector-java 依赖。由于项目中使用了 MyBaits ,所以还需要引入 mybatis-spring-boot-starter 依赖。本节实例开发完成后会使用 JUnit 进行测试,所以引入 junit 依赖。
最终,pom.xml 文件中依赖项如下:
实例:
	   <dependency>
			<groupId>org.springframework.boot</groupId>
			<artifactId>spring-boot-starter</artifactId>
		</dependency>
		<!-- 热部署 -->
		<dependency>
			<groupId>org.springframework.boot</groupId>
			<artifactId>spring-boot-devtools</artifactId>
		</dependency>
		<!-- Web支持 -->
		<dependency>
			<groupId>org.springframework.boot</groupId>
			<artifactId>spring-boot-starter-web</artifactId>
		</dependency>
		<!-- JDBC -->
		<dependency>
			<groupId>org.springframework.boot</groupId>
			<artifactId>spring-boot-starter-jdbc</artifactId>
		</dependency>
		<!-- MySQL驱动 -->
		<dependency>
			<groupId>mysql</groupId>
			<artifactId>mysql-connector-java</artifactId>
		</dependency>
		<!-- 集成MyBatis -->
		<dependency>
			<groupId>org.mybatis.spring.boot</groupId>
			<artifactId>mybatis-spring-boot-starter</artifactId>
			<version>2.1.2</version>
		</dependency>
		<!-- junit -->
		<dependency>
			<groupId>junit</groupId>
			<artifactId>junit</artifactId>
			<scope>test</scope>
		</dependency>
		<!-- 测试 -->
		<dependency>
			<groupId>org.springframework.boot</groupId>
			<artifactId>spring-boot-starter-test</artifactId>
			<scope>test</scope>
			<exclusions>
				<exclusion>
					<groupId>org.junit.vintage</groupId>
					<artifactId>junit-vintage-engine</artifactId>
				</exclusion>
			</exclusions>
		</dependency>
修改 application.properties 文件,配置数据源信息。Spring Boot 会将数据源自动注入到 MyBatis 的 sqlSessionFactory 组件中。对于我们开发者来说,这一切都是自动实现的, MyBatis 同样可以开箱即用,简单到爆炸。
实例:
# 配置数据库驱动
spring.datasource.driver-class-name=com.mysql.jdbc.Driver
# 配置数据库url
spring.datasource.url=jdbc:mysql://127.0.0.1:3306/shop?useUnicode=true&characterEncoding=utf-8&serverTimezone=UTC
# 配置数据库用户名
spring.datasource.username=root
# 配置数据库密码
spring.datasource.password=Easy@0122
开发 goods 表对应的数据对象类 GoodsDo ,代码如下:
实例:
/** * 商品类 */
public class GoodsDo {
	/** * 商品id */
	private Long id;
	/** * 商品名称 */
	private String name;
	/** * 商品价格 */
	private String price;
	/** * 商品图片 */
	private String pic;
	// 省略 get set方法
}
数据访问层直接使用接口实现即可,接口中添加商品的增删改查基本操作。
实例:
/** * 商品数据库访问接口 */
@Repository // 标注数据访问组件
public interface GoodsDao {
	/** * 新增商品 */
	public int insert(GoodsDo Goods);

	/** * 删除商品(根据id) */
	public int delete(Long id);

	/** * 修改商品信息(根据id修改其他属性值) */
	public int update(GoodsDo Goods);

	/** * 查询商品信息(根据id查询单个商品信息) */
	public GoodsDo selectOne(Long id);

	/** * 查询商品列表 */
	public List<GoodsDo> selectAll();
}
然后,我们修改 Spring Boot 配置类,添加 @MapperScan 注解,扫描数据访问接口所在的包,
实例:
@SpringBootApplication
@MapperScan("com.imooc.springbootmybatis") // 指定MyBatis扫描的包,以便将数据访问接口注册为bean
public class SpringBootMybatisApplication {
	public static void main(String[] args) {
		SpringApplication.run(SpringBootMybatisApplication.class, args);
	}
}
编写数据访问层接口之后,MyBatis 需要知道,如何将接口方法及参数转换为 SQL 语句,以及 SQL 语句执行结果如何转换为对象。这些都是通过映射文件描述的, MyBatis 映射文件就是描述对象 - 关系映射的配置文件。
首先我们通过 application.properties 指定映射文件的位置:
实例:
# 指定MyBatis配置文件位置
mybatis.mapper-locations=classpath:mapper/*.xml
然后在 resources/mapper 目录下新建 GoodsMapper.xml 文件,该文件就是 goods 表对应的映射文件,内容如下:
实例:
<?xml version="1.0" encoding="UTF-8" ?>
<!DOCTYPE mapper PUBLIC "-//mybatis.org//DTD Mapper 3.0//EN" "http://mybatis.org/dtd/mybatis-3-mapper.dtd">
<!-- 本映射文件对应GoodsDao接口 -->
<mapper namespace="com.imooc.springbootmybatis.GoodsDao">
	<!-- 对应GoodsDao中的insert方法 -->
	<insert id="insert" parameterType="com.imooc.springbootmybatis.GoodsDo">
		insert into goods (name,price,pic) values (#{name},#{price},#{pic})
	</insert>
	<!-- 对应GoodsDao中的delete方法 -->
	<delete id="delete" parameterType="java.lang.Long">
		delete from goods where id=#{id}
	</delete>
	<!-- 对应GoodsDao中的update方法 -->
	<update id="update" parameterType="com.imooc.springbootmybatis.GoodsDo">
		update goods set name=#{name},price=#{price},pic=#{pic} where id=#{id}
	</update>
	<!-- 对应GoodsDao中的selectOne方法 -->
	<select id="selectOne" resultMap="resultMapBase" parameterType="java.lang.Long">
		select <include refid="sqlBase" /> from goods where id = #{id}
	</select>
	<!-- 对应GoodsDao中的selectAll方法 -->
	<select id="selectAll" resultMap="resultMapBase">
		select <include refid="sqlBase" /> from goods
	</select>
	<!-- 可复用的sql模板 -->
	<sql id="sqlBase">
		id,name,price,pic
	</sql>
	<!-- 保存SQL语句查询结果与实体类属性的映射 -->
	<resultMap id="resultMapBase" type="com.imooc.springbootmybatis.GoodsDo">
		<id column="id" property="id" />
		<result column="name" property="name" />
		<result column="price" property="price" />
		<result column="pic" property="pic" />
	</resultMap>
</mapper>
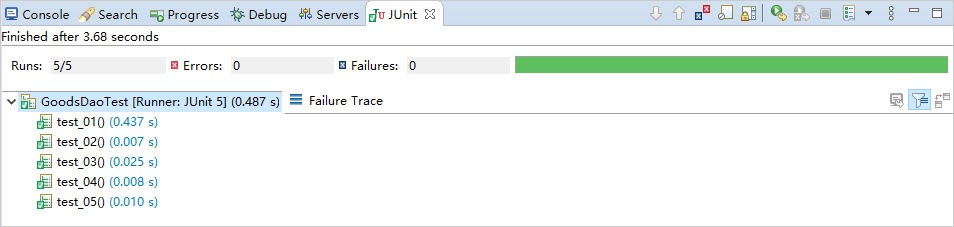
我们直接编写测试类,对数据访问接口进行测试。此处通过 @FixMethodOrder(MethodSorters.NAME_ASCENDING) 注解,使测试方法按名称顺序依次执行。这样就可以一次性测试 GoodsDao 中的所有方法了,具体测试代码如下:
实例:
/** * GoodsDao测试类 */
@SpringBootTest
@FixMethodOrder(MethodSorters.NAME_ASCENDING) // 按方法名称顺序测试
class GoodsDaoTest {

	@Autowired
	private GoodsDao goodsDao;

	/** * 新增一个商品 */
	@Test
	void test_01() {
		GoodsDo goods = new GoodsDo();
		goods.setName("手机");
		goods.setPic("phone.jpg");
		goods.setPrice("2000");
		int count = goodsDao.insert(goods);
		assertEquals(1, count);// count值为1则测试通过
	}

	/** * 更新商品信息 */
	@Test
	void test_02() {
		GoodsDo goods = new GoodsDo();
		goods.setId(1L);
		goods.setName("手机");
		goods.setPic("phone.jpg");
		goods.setPrice("3000");
		int count = goodsDao.update(goods);
		assertEquals(1, count);// count值为1则测试通过
	}

	/** * 获取商品信息 */
	@Test
	void test_03() {
		GoodsDo goods = goodsDao.selectOne(1L);
		assertNotNull(goods);// goods不为null则测试通过
	}

	/** * 删除商品 */
	@Test
	void test_04() {
		int count = goodsDao.deletex(1L);//此处应为delete(1L)
		assertEquals(1, count);// count值为1则测试通过
	}

	/** * 获取商品信息列表 */
	@Test
	void test_05() {
		List<GoodsDo> goodsList = goodsDao.selectAll();
		assertEquals(0, goodsList.size());// goodsList.size()值为0则测试通过
	}
}
测试结果如下,说明所有测试都通过了。
MyBatis 可以自由的编写 SQL 语句,开发人员可以充分发挥 SQL 语句的性能。
Spring Boot 中使用 MyBatis 操作数据库十分方便,引入相关依赖后,定义数据访问接口,然后通过映射文件描述对象 - 关系映射即可。当然不要忘记通过 MapperScan 注解扫描数据访问接口所在的包,以便发现和注册相关的组件。
MyBatis 还有一些简化开发的工具和框架,如 MyBatis-Plus 、 MyBatis-Generator ,可以简化 MyBatis 开发过程,在一定程度上提高开发效率。感兴趣的同学可以通过网络获取相关资料进一步学习。