-
未登录
热门文章
今天要学的布局和上一节的 TableLayout 很类似,是在 Android 4.0 版本引入的布局方式。GridLayout 很有意思,自从引入之后在 Android 开发圈有以下特点:
顾名思义 GridLayout 可以帮助你完成各式各样的网格形式的布局,比如一个计算器、或者一个登陆框。如果你前面学扎实也许会质疑,这个可以用嵌套的 LinearLayout 来代替,这也是为什么很多人不愿意用 GridView 的原因。但是你是看过xx网教程的人,已经是个成熟的新手了,这里我们需要强调的是**“性能”**,我们在开发中不仅要实现功能,同时要注重APP的性能。GridView 相比于 LinearLayout 层级更浅,所以它拥有更好的性能表现。这也是为什么我希望大家能够重视 GridLayout 的原因,好了,接下来看看如何使用。
GridLayout的目的是将多个 View / ViewGroup 按照网格的形式排列起来,所以大多数的属性都是为了规范一个网格的样式。
    android:rowCount="3"
    android:columnCount="4"
  android:layout_row="4"
  android:layout_column="0"
  android:layout_rowSpan="2"
  android:layout_columnSpan="3"
在编写代码之前,我们先来一起来分析分析这个页面,一步一步的把它拆分成一个网格:
match_parent即可基本上按照以上思路就可以把整个页面按照网格分割好,接下来就可以开始 xml 代码的编写了:
<?xml version="1.0" encoding="utf-8"?>
<GridLayout xmlns:android="http://schemas.android.com/apk/res/android" android:layout_width="match_parent" android:layout_height="match_parent" android:columnCount="3" android:useDefaultMargins="true">
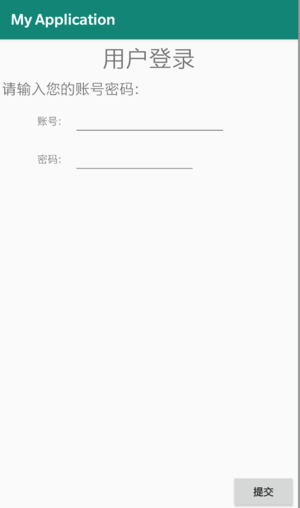
<TextView android:layout_columnSpan="3" android:layout_gravity="center_horizontal" android:text="用户登录" android:textSize="32sp" />
<TextView android:layout_columnSpan="3" android:layout_gravity="left" android:text="请输入您的账号密码:" android:textSize="20sp" />
<TextView android:layout_gravity="right" android:text="账号:" />
<EditText android:ems="10" />
<TextView android:layout_column="0" android:layout_gravity="right" android:text="密码:" />
<EditText android:ems="8" />
<Button android:layout_row="3" android:layout_column="2" android:layout_gravity="bottom" android:text="提交" />
</GridLayout>
以上代码有几点需要注意:
GridLayout 结合了 LinearLayout、RelativeLayout、FrameLayout、TableLayout 的当中的一些特性,它可以实现一些需要多层 View 嵌套才能实现的布局效果。我们要想与其他开发者拉开差距,就必须在编写UI的时候不只看效果是否达到,更需要考虑底层的性能损耗。这也是 GridView 的一大优势。
在实际开发中,我们往往会结合各种各样的布局完成我们的 UI,但是很重要的一点是选择你的顶层(root)布局的时候一定要深思熟虑,因为它会直接影响到你的 UI 绘制性能和内存消耗。