-
未登录
热门文章
到这里基本上你已经掌握了 Android 所有的常用控件,不知道有没有这样的疑惑:如果控件太多,在有的小尺寸手机上将屏幕占满了怎么办?是不是有一种通用的解决方法?没错,本节的主角——ScrollView 就是来帮你解决这个问题的,它让你的控件能够在屏幕显示不足的情况下,支持滚动展示。
ScrollView 是一种可以有效解决由于 View 过多显示不全的布局,它可以让控件在横向或者纵向上支持滚动显示。它其实是一个 FrameLayout,内部可以包含一个或多个 View / ViewGroup,当然它的滚动效果也只会作用于子 View / ViewGroup 当中。
另外需要注意的是因为它是一个 FrameLayout,所以我们需要注意它的布局排列方式(对于 FrameLayout 的布局方式可以参考第 11 节的内容),大多数场景下我们需要结合其他的布局一起使用,其实最简单的使用方式就是直接在写好的布局外面套一个 ScrollView 就可以支持滚动了。
ScrollView 默认是纵向的滚动,如果需要横向滚动可以使用HorizontalScrollView,只是方向不同,用法是完全一样的。
注:对于需要支持滚动的场景而言,ScrollView 是一个非常完美的解决方案,但是我们后面会学到两大滚动列表控件——ListView / GridView,因为这两个控件天生就带有滚动效果,所以通常我们不会将 ScrollView 和这两个控件一起使用。
通常无论是控件还是布局我们会先介绍属性,但是 ScrollView 本质是一个 FrameLayout,作用也只是增加一个滚动效果,并没有什么很特别的属性,这里主要介绍一下几个控制滚动的 API:
ScrollView.FOCUS_DOWN 表示滚动到底部;ScrollView.FOCUS_UP 表示滚动到顶部。ScrollView 的适用场景也很明显,我们人为创造一个 View 过多的场景即可。
首先布局文件主要包括 3 个部分:
然后我们将两个用于跳转的 Button 放入一个 LinearLayout 中,和 ScrollView 同层,这样两个 Button 就不会响应 ScrollView 的滑动,然后在 ScrollView 中添加一个 LinearLayout 用来管理需要滑动的 n 个 View,布局文件如下:
<?xml version="1.0" encoding="utf-8"?>
<FrameLayout xmlns:android="http://schemas.android.com/apk/res/android" android:layout_width="match_parent" android:layout_height="match_parent">

    <ScrollView android:id="@+id/scrollView" android:layout_width="match_parent" android:layout_height="wrap_content" android:padding="30dp">

        <LinearLayout android:id="@+id/button_group" android:layout_width="match_parent" android:layout_height="match_parent" android:gravity="center" android:orientation="vertical">

            <TextView android:layout_width="wrap_content" android:layout_height="wrap_content" android:layout_gravity="center" android:layout_marginTop="80dp" android:text="ScrollView" android:textSize="25dp" android:textStyle="bold" />

            <TextView android:layout_width="wrap_content" android:layout_height="wrap_content" android:layout_gravity="center" android:layout_marginTop="20dp" android:text="Welcome to Imooc Android" />
            <!-- 在Java代码中动态添加若干个Button,超出屏幕范围即可滑动 -->
        </LinearLayout>
    </ScrollView>

    <LinearLayout android:layout_width="wrap_content" android:layout_height="wrap_content" android:orientation="vertical">

        <Button android:id="@+id/bt_to_top" android:layout_width="wrap_content" android:layout_height="wrap_content" android:layout_marginTop="30dp" android:text="滚动到顶部" />

        <Button android:id="@+id/bt_to_bottom" android:layout_width="wrap_content" android:layout_height="wrap_content" android:layout_marginTop="30dp" android:text="跳转到底部" />
    </LinearLayout>
</FrameLayout>
以上代码主要实现了两个 Button 及一个 ScrollView,可以看到 ScrollView 中只有一个 LinearLayout,而 LinearLayout 中只有两个 Button,所以我们需要在 Java 代码中动态添加 Button,这里也可以让大家熟悉一下如何动态创建并添加 Button。接下来在 Java 代码中主要做两件事:
代码如下:
package com.emercy.myapplication;

import android.app.Activity;
import android.os.Bundle;
import android.view.View;
import android.widget.Button;
import android.widget.LinearLayout;
import android.widget.ScrollView;
import android.widget.Toast;

public class MainActivity extends Activity implements View.OnClickListener {

    public static final int BUTTON_COUNT = 10;

    private ScrollView mScrollView;

    @Override
    protected void onCreate(Bundle savedInstanceState) {
        super.onCreate(savedInstanceState);
        setContentView(R.layout.activity_main);

        findViewById(R.id.bt_to_top).setOnClickListener(this);
        findViewById(R.id.bt_to_bottom).setOnClickListener(this);
        mScrollView = findViewById(R.id.scrollView);

        LinearLayout layout = findViewById(R.id.button_group);

        for (int i = 0; i < BUTTON_COUNT; i++) {
            Button button = new Button(this);
            LinearLayout.LayoutParams params =
                    new LinearLayout.LayoutParams(LinearLayout.LayoutParams.WRAP_CONTENT, LinearLayout.LayoutParams.WRAP_CONTENT);
            params.topMargin = 100;
            layout.addView(button, params);
            button.setOnClickListener(this);
            button.setText(i + "");
        }
    }


    @Override
    public void onClick(View v) {
        switch (v.getId()) {
            case R.id.bt_to_top:
                mScrollView.fullScroll(ScrollView.FOCUS_UP);
                break;
            case R.id.bt_to_bottom:
                mScrollView.fullScroll(ScrollView.FOCUS_DOWN);
                break;
            default:
                Toast.makeText(this, "当前点击的是第" + ((Button) v).getText() + "个Button", Toast.LENGTH_SHORT).show();
                break;
        }
    }
}
效果如下:
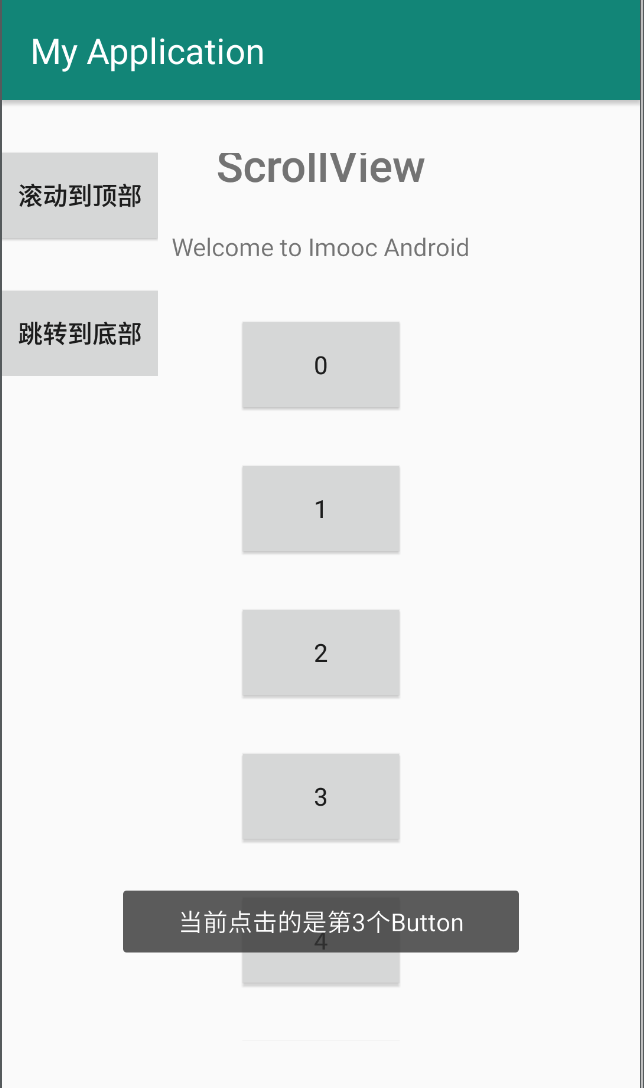
我们在代码中通过 for 循环往 ScrollView 中添加了 10 个 Button,动态添加一个 View 主要有以下 4 步:
我们在创建 Button 的同时通过setText及setOnClickListener设置了文本及点击事件,然后在点击的时候展示当前 Button 的序号。
本节学习了一个新的 ViewGroup,它主要解决的就是当子 View 过多而导致屏幕显示不下的问题。通过将过多的 View 放在一个 ScrollView 当中,系统会让这些 View 支持列表滑动显示,并提供了简单的 API 帮助我们操作列表。对于需要横向排列的 View 我们直接将 ScrollView 换成 HorizontalScrollView 即可,其他的使用方式完全一样。
整体来说 ScrollView 是一种比较直接的实现列表的方式,优点是使用简单,而且一目了然;缺点是数据和 UI 强耦合在一起,我们需要考虑的东西非常多,在实现复杂列表逻辑的时候会显得很臃肿,这点在下一节以及后面学到 ListView / GridView 之后就会有深切的体会。