-
未登录
热门文章
前面 6 节分别学习了 Android 的六大布局,它的功能就是将 View 及 ViewGroup 按照一定的规则摆放起来,那么接下来的章节我们就来学习 Android 中常见的 View。
首先我们看看 TextView,它是 Android 中很常用的 View,用来展示文本信息。它通常会其他的 View 一起搭配使用,用来作为提示信息。比如我们前面做过的登陆界面,就会搭配 EditText,显示输入的内容提示。
android:hint为 TextView 设置一个默认值,在没有拉到服务器数据的时候展示默认文本。以上是最常用的属性,大多数场景已经足够,通过这些属性我们就可以展示我们需要的文本信息了,如下:
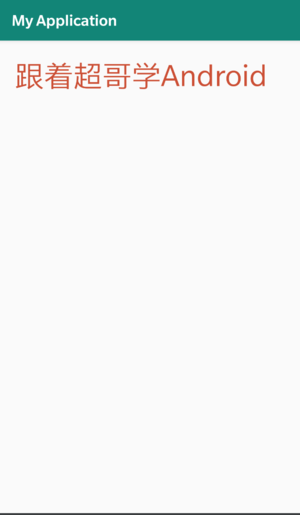
<TextView xmlns:android="http://schemas.android.com/apk/res/android" android:layout_height="wrap_content" android:layout_width="wrap_content" android:padding="20dp" android:text="跟着超哥学Android" android:textColor="#CE4F2F" android:textSize="40sp" />
注意:通常我们的 xml 最外层是一个 ViewGroup,它帮我们摆放各种 View,但是如果只有一个 View 的时候,是可以直接放在 xml 里面的。
代码比较简单,直接看效果:
也许你并不满足于普通样式的 TextView,那么接下来介绍一些高级属性,让你的文本框更多丰富生动。
下面我们加上一些高级属性,可以做出不同寻常的效果:
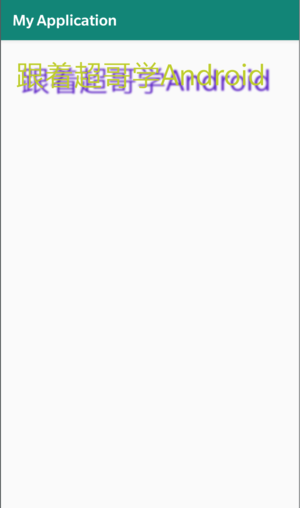
<TextView xmlns:android="http://schemas.android.com/apk/res/android" android:layout_width="wrap_content" android:layout_height="wrap_content" android:layout_centerInParent="true" android:padding="20dp" android:shadowColor="#5919C9" android:shadowDx="20.0" android:shadowDy="20.0" android:shadowRadius="4.5" android:text="跟着超哥学Android" android:textColor="#BECF0B" android:textSize="40sp" />
我们在第一个 demo 的基础之上加上了阴影效果,如图:
针对 TextView 有一个android:background属性,可以为我们的文本框设置一个自定义的背景图,通常有两种设置方法:
直接设置一个图片作为背景图;
设置一个 drawable 资源。
(关于 drawable 的介绍可以参考第四节)
直接设置图片比较好理解,就不做过多的演示,大家可以自行尝试,这里主要讲解一下采用 drawable 资源的用法。
<selector/>,删除默认生成的代码,添加一个<shape/>标签,用来指定 TextView 的外形;<shape/>标签中添加<stroke/>,设置 TextView 外形的边框样式,设置边框的宽度和颜色;<shape/>中继续添加<padding/>标签,用来设置 TextView 中文本和边框的距离;<shape/>标签中添加<gradient/>,为 TextView 的背景添加色彩渐变。最终整体代码修改如下:
<?xml version="1.0" encoding="utf-8"?>
<shape xmlns:android="http://schemas.android.com/apk/res/android">

    <!-- 设置边框颜色和宽度 -->
    <stroke
        android:width="10dp"
        android:color="#000000" />

    <!-- 设置边距 -->
    <padding
        android:bottom="5dp"
        android:left="5dp"
        android:right="5dp"
        android:top="5dp" />

    <!-- 添加渐变效果 -->
    <gradient
        android:angle="45"
        android:endColor="#EEC5C5"
        android:startColor="#0A22A5" />

</shape>
至此,drawable 资源编写完毕,我们就可以在 TextView 中使用了。直接修改TextView的代码,添加android:background属性:
<TextView xmlns:android="http://schemas.android.com/apk/res/android" android:layout_width="wrap_content" android:layout_height="wrap_content" android:layout_centerInParent="true" android:background="@drawable/text_backgroud" android:padding="20dp" android:shadowColor="#5919C9" android:shadowDx="20.0" android:shadowDy="20.0" android:shadowRadius="4.5" android:text="跟着超哥学Android" android:textColor="#BECF0B" android:textSize="40sp" />
最终效果:

TextView 是最常用的一个 Android 原生 View,虽然它的特效属性比较多,但是其实工作中可能大部分时候还是只会用基本属性,所以更多的特效大家只需要了解即可。后面将要学习的很多控件都是基于 TextView 来设计开发的,会有很多的共同之处,希望大家学完之后能够动手实践一些样式,比如搭配前面学习的各种 Layout 来使用,试试不看例子,自己实现一个登陆页面吧。